
RigX User Guide
Introduction
Welcome to the RigX User Guide! This guide provides a step-by-step instructions on using RigX features, troubleshooting issues, and optimizing workflows.
Getting Started
This section covers how to install and set up RigX for first-time users. It also introduces the main interface and navigation controls.
Requirements for the Tool
- Maya 2025.
- Maya packages:
mayapy -m pip install pymel
mayapy -m pip install orjson
mayapy -m pip install scipy
mayapy -m pip install py-machineid
mayapy -m pip install requests
About the Tool
- Works out of the box with RigX topology and Metahuman topology for fast pipeline integration.
- Can support any head topology.
- By default, RigX uses neither blendshapes nor joints for facial movement.
- The system can support both blendshapes and joints if required by the pipeline.
Installation Steps
- Install Required Packages
Open Command Prompt (cmd) as Administrator.
Navigate to Maya’s bin directory:
cd “C:\Program Files\Autodesk\Maya2025\bin”
Install the required packages using mayapy one by one:
mayapy -m pip install pymel
mayapy -m pip install orjson
mayapy -m pip install scipy
mayapy -m pip install py-machineid
mayapy -m pip install requests - a) Copy Tool Files From the downloaded folder,
copy the rigX folder into: C:\Program Files\2DNAC
(You will need to manually create the 2DNAC folder)
b) Copy the following files and folders:
– resource_files
– 2DNAC_rigX_plugin.py
– face_control.mll
Paste them into:
C:\Users\<YourUserName>\Documents\maya\2025\plug-ins
(If the plug-ins folder doesn’t exist, create it manually.)
c) Copy the folder rigX_projects to the location where you want to store all your projects and characters.
(Example: K:\test\project\rigX_projects) - Configure Project Path
Open the file: C:\Program Files\2DNAC\rigX\config_file.py
in a text editor (e.g., Notepad or Notepad++).
Update the project path inside the file to match the location where you copied rigX_projects.
Example: PROJECT_PATH = “K:\\test\\project\\rigX_projects”
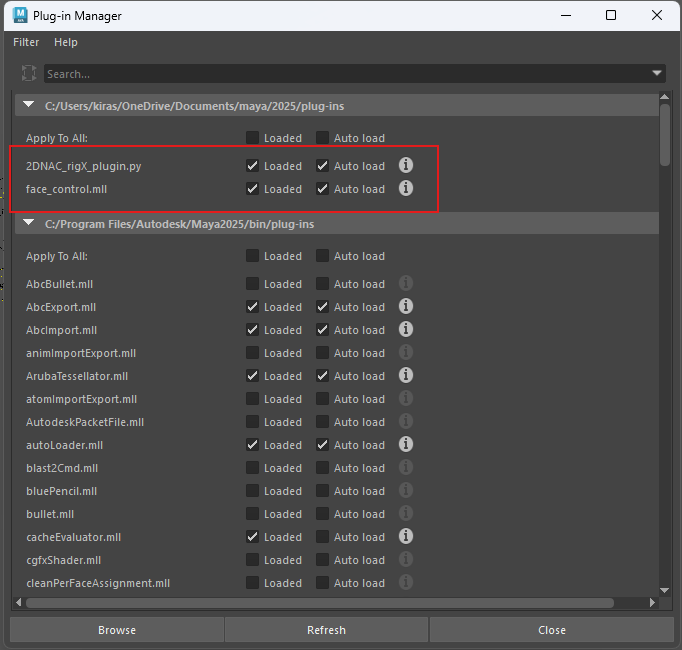
Save the file. - Load Plugins in Maya: Open Maya 2025.
Go to Windows → Settings/Preferences → Plug-in Manager.
Enable the following:
– 2DNAC_rigX_plugin.py
– face_control.mll

- Activate RigX
In Maya, open 2DNAC → RigX from the top menu.
Enter your license key when prompted. - Done
RigX is now installed and ready to use. 🎉
Activating the Tool in Maya
- Open Maya
- Navigate to Window → Settings/Preferences → Plug-in Manager.
- See Picture 1 for reference.
- Locate 2DNAC_plugin in the list and check the following options:
- Load
- Auto Load (ensures the plugin loads automatically each time Maya starts)
- See Picture 2 for reference.
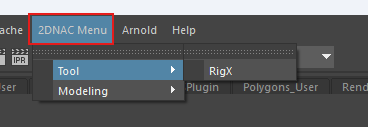
- Once loaded, a dropdown menu for the plugin will appear next to the Help.
Introduction to the Main Interface and Navigation Controls
When you navigate to the 2DNAC Menu you can find two submenus: Tool and Modeling.
In the Tool submenu you can find RigX. (See picture 3)
In the Modeling submenu you can find:
– Delta
– ImportExport_tool
– Isolation_Tool
– Mesh_Normalize
– ToogleVisibility_tool
Core Features & Tools
RigX provides a powerful set of tools for 3D character rigging and editing.
Key features include:
– Project setup
– Metahuman to RigX
– Setup RigX File
– Character Editor
– Delta
– ImportExport_tool
– Isolation_Tool
– Mesh_Normalize
– ToogleVisibility_tool
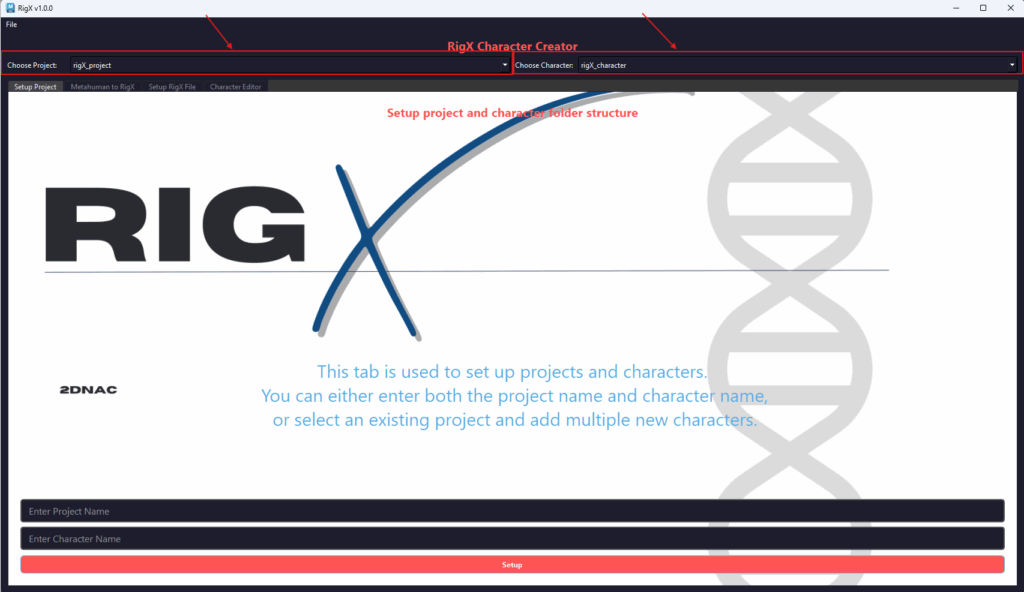
Setup Project
You can select the project and character from the top bar.
Picture 4: Choosing a Project and Character
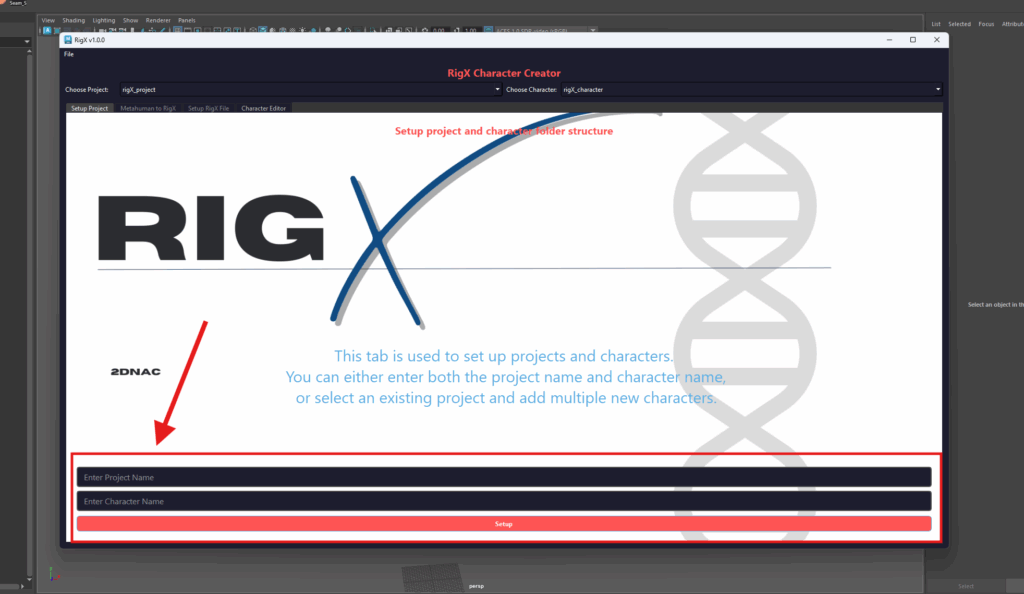
To create a new project, enter the desired Project Name and Character Name, then click the Setup button.
Picture 5: Creating a New Project and Character
If you need to rename an existing project or character, this can be done manually within the folder structure.
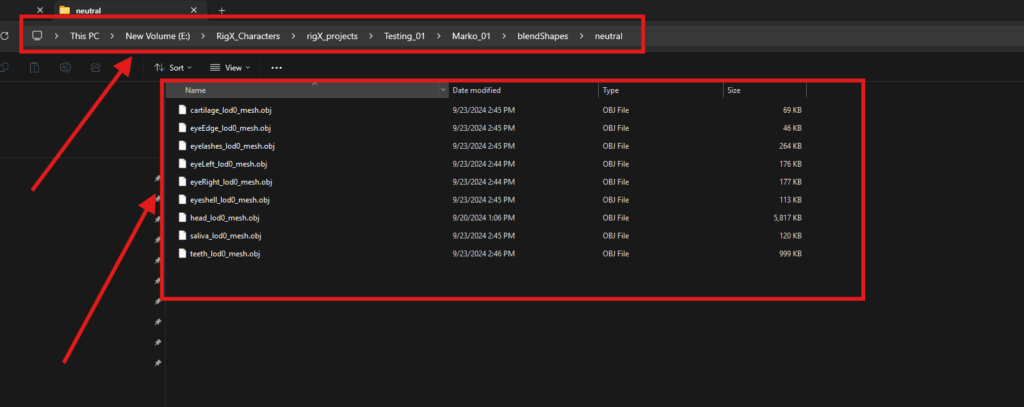
How to Build a Rig
- In your project, navigate to:
- \Projects\PROJECT_NAME\CHARACTER_NAME\BlendShapes\Neutral
- Place the MetaHuman topology meshes for the head in this folder.
Required files (if available):- head_lod0_mesh
- cartilage_lod0_mesh
- eyeEdge_lod0_mesh
- eyelashes_lod0_mesh
- eyeLeft_lod0_mesh
- eyeRight_lod0_mesh
- eyeshell_lod0_mesh
- saliva_lod0_mesh
- teeth_lod0_mesh
- Important Notes:
- The system works without a body.
- RigX generates a custom rigx.dna file for each character.
- During setup, you can:
- Use a default RigX DNA to build a new character.
- Use a custom DNA if you already have a tailored character and want its facial deformations to influence the new one.
Metahuman to RigX
Open any rigged Metahuman in Maya (any version of metahuman) and select the project and character you want to transfer it to. On the left side of the tool, you will see properly named assets that come with the Metahuman LOD0 head. If you do not need some of these assets, simply remove the name from the bar and leave it empty.
Once everything is set, click the Transfer Metahuman to RigX button at the bottom of the RigX tab. The tool will analyze all Metahuman shapes, rigs, and features, and gather the data needed to generate the RigX files. Depending on your PC’s performance, this process may take approximately 15 minutes.
After the transfer is complete, proceed to the Setup RigX File tab and click only the Calculate RigX button to generate a full character rig ready for use.
See Picture 6 for reference.
Setup RigX File
You can choose the expressions you want for your character. These combinations affect the complexity of your rig: fewer expressions result in lighter files, while more expressions create larger files. If all expressions are enabled, your character will have around 800 shape combinations, but you are free to customize them according to your project’s needs.
- Select All – Enables all expressions for rig calculation.
- Deselect All – Disables all expressions for rig calculation.
- Export List – Saves the selected expressions to use later on another character.
- Import List – Loads a previously saved list of expressions.
The Calculate RigX File function will take into account the expressions you have selected. Once the calculation is complete and the files are generated, click the Calculate RigX button to create a fully working character in Maya.
The tool will automatically apply shaders to all assets, and the GUI will be fully connected, allowing you to test your character immediately.
See Picture 7 for reference.

Character Editor Guide
Setting Up the Scene
After calculating your RigX, click Setup Character.
See Picture 8 for reference.
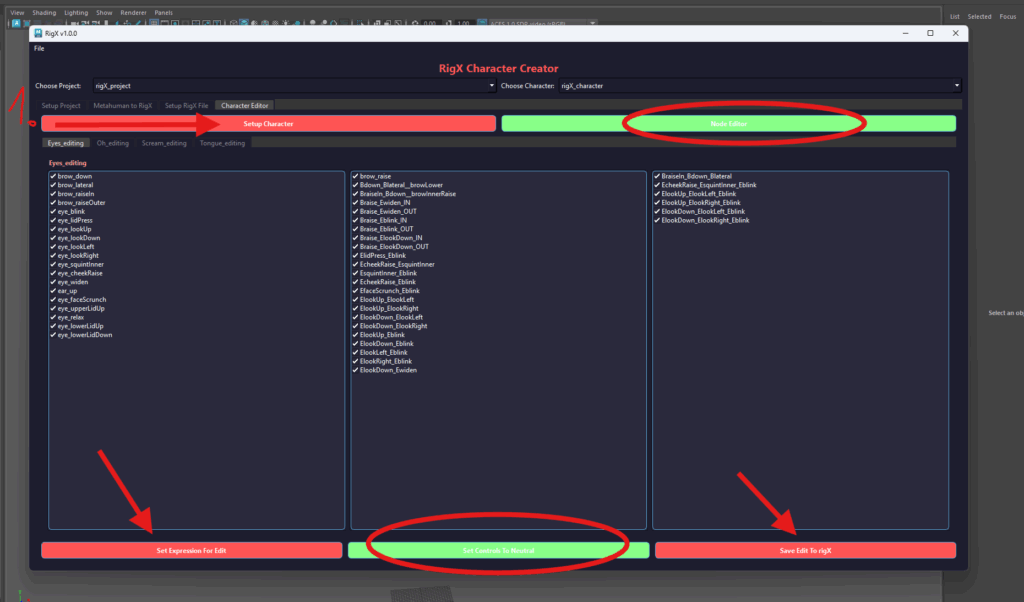
Managing Expressions
Set Expression Button
- Double left-click an expression from the branches to select it and turn on the Rigged head(last head on the right).
- Click Set Expression for Editing to transfer the selected expression to the middle (working) head.
- This allows you to blend it with the neutral pose or any other active expression on the rig head (last head on the right).
- Blending helps you observe how the expression affects vertices and ensures proper loop movement.
Tips:
- Double-clicking any expression in the branches will immediately activate it on the rig head.
- When using the Set Expression for Edit button, the expression transfers to the working head and blends from 0 to 40. Always work on the 40th frame, as it represents the final expression.
- The blend occurs between the rig head and the working head, based on their current states.
Editing Expressions
Save Edit to RigX
- Manually edit the active expression (e.g., brow down) on the working head.
- Observe how this modification influences related expressions, ensuring consistent changes across the rig.
- Click Transfer to Rig to apply your edits.
- Changes affect the selected expression as well as its combinations, maintaining coherence across the rig.
Checking Your Transfer:
- Double-click the edited expression once transferred.
- If sliding from frame 0 to 40 produces no change, it confirms a complete transfer.
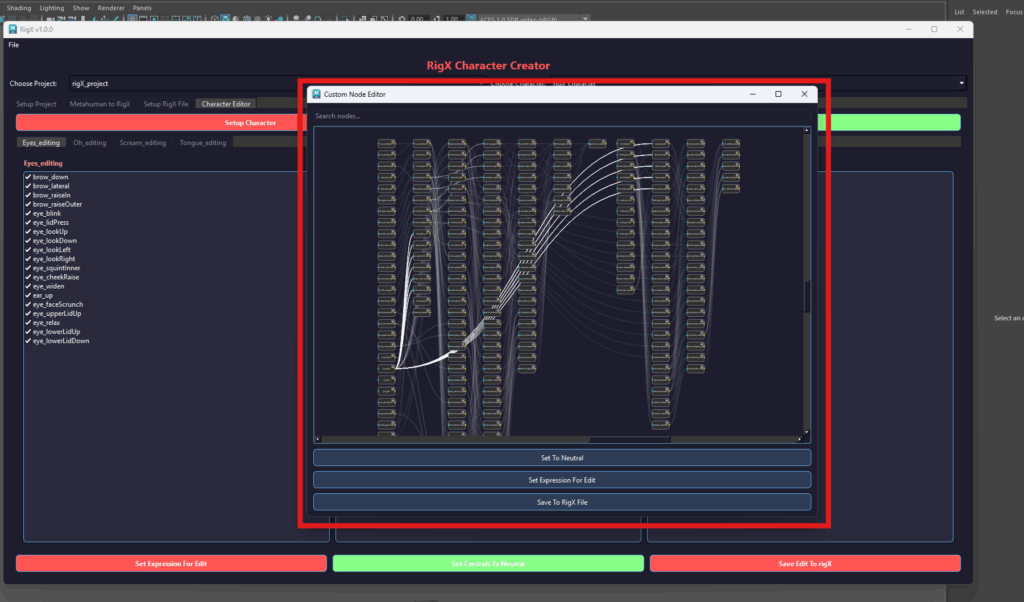
Editing Options
There are two ways to edit expressions:
- Directly from the main tool.
- From the Node Editor:
- Click the green Node Editor button.
- Here you can see how expressions interact and what influences what.
- Options include color-coding and search functionality for fast access.
- All main tool buttons are available in the Node Editor, allowing seamless workflow between the two interfaces.
See Picture 9 for reference.
Resetting Controls
Set Controls to Neutral
- Resets all GUI controls to the neutral position (value = 0).
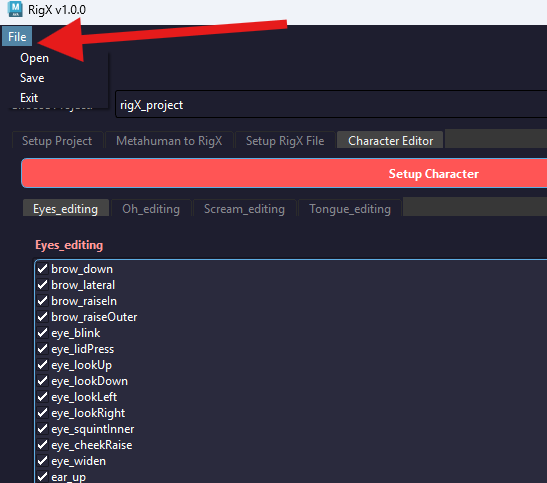
File Save/Open
The File tab is located in the top-right corner of the interface. Clicking it provides the following options:
- Save Scene – Save the current scene.
- Open Scene – Open a previously saved scene.
- Close Tool – Exit the RigX tool.
See Picture 10 for reference.
Delta Tool
The Delta tool allows you to quickly create high-end expressions and isolate specific ones from combinations. It requires three head models to operate and is compatible with humanoid characters.
See Picture 11 for reference.
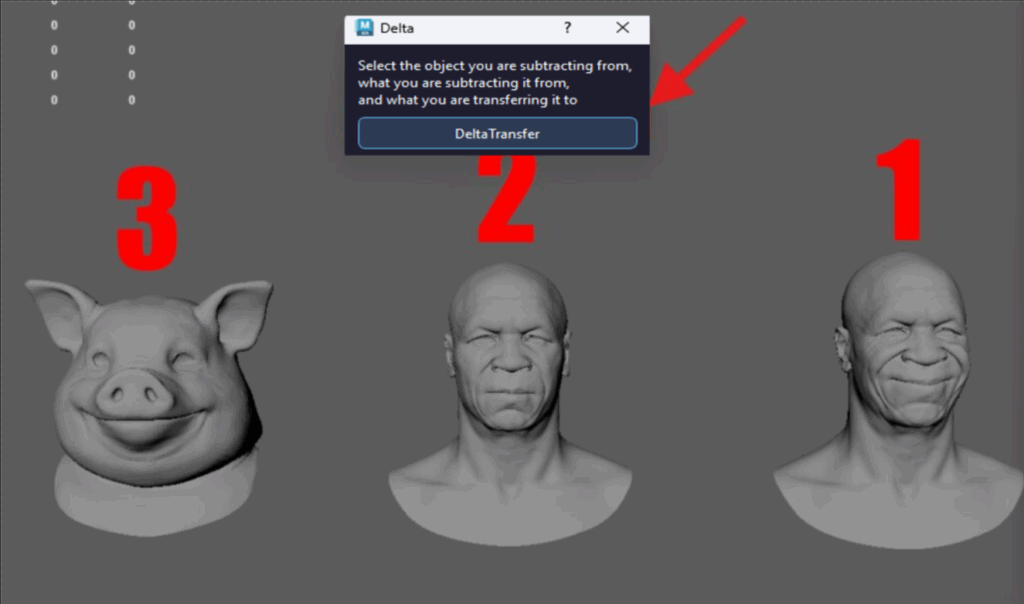
Example: Transferring an Expression
In this example, we will transfer an expression from a custom MetaHuman to a PIG MetaHuman without manual adjustments.
Steps:
- Copy the neutral expression of the character you are transferring from.
- Select the desired expression to transfer (e.g., mouth_cornerPull).
- Copy the neutral head of the target PIG MetaHuman.
- Select the heads in the following order:
- Expression from the original character (mouth_cornerPull)
- Neutral version of the original character
- Target character receiving the expression
- Click the Delta Transfer The expression will be applied automatically to the target character.
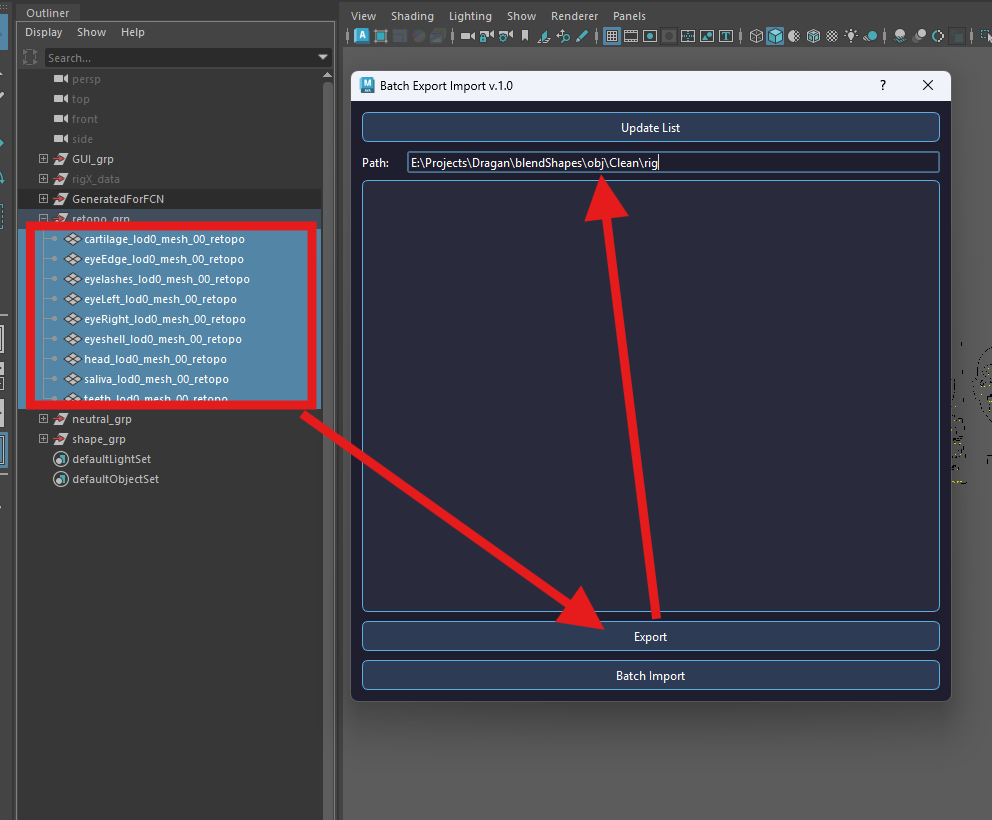
Import/Export
The Import/Export tool allows you to import or export meshes efficiently.
Importing a Mesh
- Choose the file path to the mesh you want to import.
- Click Update List to display the meshes from the selected folder.
- To import a mesh:
- Double-click the mesh from the list, or
- Click Batch Import to import multiple meshes at once.
Exporting a Mesh
- Select the mesh you want to export.
- In the Import/Export tool, click the Export button to save the mesh.
See Picture 12 for reference.
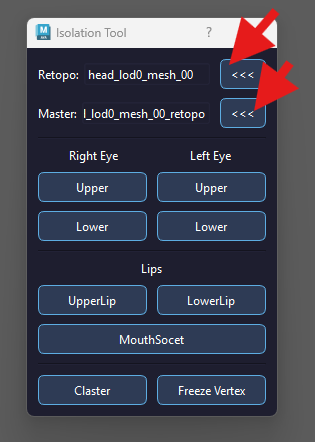
Isolation Tool
The Isolation Tool is used to isolate specific parts of a mesh, which is helpful for tasks such as retopology or detailed editing.
Using the Isolation Tool
- Select the Retopo Mesh:
- Click the <<< button next to the Retopo field to assign the mesh.
- Select the Master Mesh:
- Click the <<< button next to the Master field to assign the master mesh.
- Isolate a Part of the Mesh:
- Use the buttons below to choose which part of the mesh you want to isolate.
See Picture 13 for reference.
- Use the buttons below to choose which part of the mesh you want to isolate.
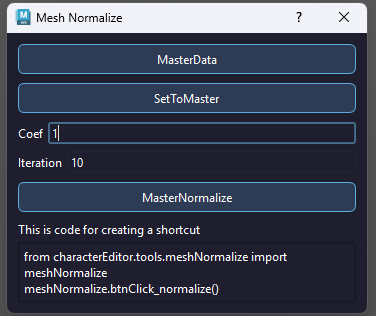
Mesh Normalize
The Mesh Normalize tool is primarily used during the retopology process to align loops with the direction of a master shape where retopology has already been completed.
Using Mesh Normalize
- Select the Master Mesh
- Choose the mesh that already has completed retopology.
- Add Master Data
- Click the MasterData button to load the master mesh into the tool.
- Apply Normalization
You have two options:- MasterNormalize – Enter the number of iterations, then click MasterNormalize. The selected vertices will gradually align with the master mesh based on the specified iteration count.
- SetToMaster – Click SetToMaster to immediately move the selected vertices to match the master mesh fully.
See Picture 14 for reference.
Toggle Visibility
- Toggle_Visibility is allowing us to toggle between two or more meshes made into layers, which can be very useful when you want to compare those meshes.
- In order to use Toggle_Visibility you need to choose layers you want and input their names. You have fields for 5 layers’ names. By pressing the Toggle Layers button, you can now toggle between them by pressing ` shortcut on the keyboard.
See Picture 15 for reference.
